An animatic is made by sequencing storyboard frames with specific timing, then adding scratch voiceover, temp music, and basic sound effects so the whole thing plays through like a rough cut of the final film. You can do it in any video editor, a dedicated animatic tool, or — modern workflow — an AI-native platform that generates the frames and lets you time them in the same place.
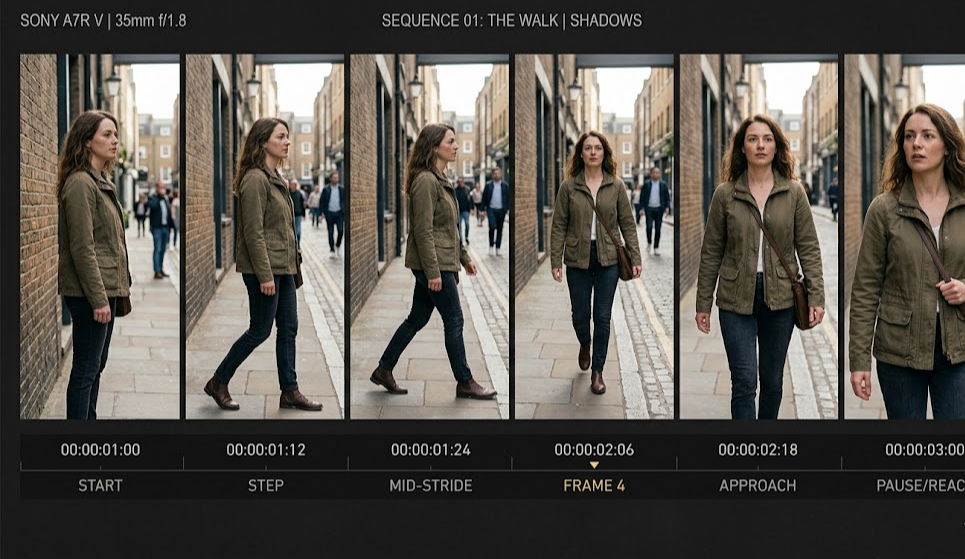
A multi-track animatic: frames on top, voice, temp music, and sound effects below.
This is the practical guide. No fluff about what animatics are (that's a separate post). Just the steps, in order.
The six steps
1. Lock your script and storyboard first
You cannot animatic a sequence you haven't planned. Before you touch a timeline:
Finalize the script — beats, dialogue, key moments. It will change during animating, but you need a draft you're not actively revising this hour.
Storyboard every shot — one frame per shot minimum, more if the action is complex. A 30-second commercial might need 15–25 frames. A 2-minute short film might need 40–60 frames.
If you don't have a storyboard yet, start there. An animatic without frames is just a timeline with placeholders.
Shortcut: generate your storyboard with AI instead of drawing it by hand — tools like M Studio turn your script directly into storyboard frames with consistent characters and shot descriptions. That compresses days into an afternoon.
2. Import frames into a timeline
You have two real options:
A standard video editor — Premiere, Final Cut, DaVinci Resolve. Import frames as stills, drop them on a video track in order.
A dedicated animatic or AI-native tool — Boords, Storyboarder, Toon Boom Storyboard Pro, M Studio. These are built for frame-timing workflows and skip a lot of manual setup.
For a one-off, any editor works. For ongoing production, a dedicated tool saves time on every iteration — renaming shots, re-importing changed frames, exporting multiple versions for review.
3. Set per-frame timing
This is the actual work. Every frame holds for a specific number of seconds — the time a viewer's eye would spend on that shot in the final film.
Don't guess. Read the action in the shot out loud while watching it. If the character takes three seconds to pick up a coffee cup, the shot is three seconds. If the line is four syllables, it's half a second to a second per syllable depending on delivery.
Adjust as you go. Watching it play back tells you instantly whether a shot is too long or too short.
4. Add scratch voiceover
Even a silent animatic tells you something. A voiced animatic tells you everything.
Record yourself reading the dialogue into your phone, your laptop mic, or a basic USB mic. Quality doesn't matter at this stage — what matters is that the audio is real words with real pacing. A flat line-read at 90 words per minute sounds nothing like a tense pause-heavy delivery at 60.
If you need multiple voices:
Record each character on a separate pass
Or get two friends to read opposite you
Or use AI-generated voiceover — acceptable for animatics because it's placeholder anyway
Drop the voice track into the timeline. Align dialogue with the frames showing the character speaking.
5. Add temp music and sound effects
Don't use licensed tracks. Use anything that captures the mood — YouTube's free audio library, scratch piano recordings, royalty-free music stock sites, or AI-generated scores.
Drop the music on its own audio track. Lower the volume under dialogue. Fade it in and out around key moments.
Sound effects: footsteps, door slams, ambient room tone, impact sounds. You don't need a Foley artist — even rough SFX from a free library will do what they need to do: signal to the reviewer that audio is planned there.
6. Play it back — watch it like a real viewer
You've now assembled the thing. Before you do anything else:
Watch it start to finish, no stopping, on the timeline you'll ultimately export to (usually 24 fps).
Write down every moment that felt wrong — too fast, too slow, unclear, boring, missing, extra.
Watch it again with the notes. Some of them will disappear on the second watch; those weren't real problems. The ones that persist are real.
Fix the persistent problems — adjust shot timing, add a frame, cut a beat, tighten the dialogue.
Repeat until it plays through without you noticing pacing issues. That's done.
7. Export for review
MP4 is the only format that matters for sharing. 1080p is plenty for an animatic. Bitrate doesn't need to be high — reviewers are watching content, not quality.
Most tools also let you export a shareable review link. If yours does, use it. Review links let a director, agency, or client scrub the timeline, leave timecoded comments, and not download anything. Much faster than email attachments.
Export the animatic as MP4 or share a review link — what your director or client actually watches.
Shortcuts if you're using an AI workflow
Modern AI tools compress this whole pipeline:
Script → storyboard in one step — AI generates frames directly from your script.
Frame timing auto-suggested — tools infer a starting duration from scene descriptions; you adjust.
AI voiceover — paste the dialogue, pick a voice, get usable scratch audio in seconds.
AI music and SFX — generate a score or sound effect from a text prompt.
Export and review — MP4 plus a review link, one click.
M Studio works this way. Script in, animatic out, in under an hour for a 2-minute piece.
Common mistakes to avoid
Treating the animatic as a drawing exercise. The point is timing, not art. Don't spend three hours on a frame. If you're polishing, you're stalling.
Too little audio. Without scratch voice and rough music, the timing can feel right on paper but wrong when watched. Animatics are multi-sensory by design.
Over-polishing. Once you're rendering the animatic through an effects pipeline, you're not making an animatic anymore. Keep it rough.
Skipping playback between iterations. If you don't watch it after every change, you'll drift from what the sequence actually feels like.
Not sharing it before animation starts. The whole point of an animatic is feedback. If only you see it, you've wasted half the value.
How long should making an animatic take
Sequence lengthHand-drawn workflowAI-assisted workflow | 30-second commercial | 1–2 days | 1–4 hours | 2-minute short film | 3–5 days | 4–8 hours | 5-minute explainer | 1 week | 1–2 days | 10-minute episode | 2 weeks | 3–5 days
If you're spending 10x those numbers, you've crossed from animatic into animation. Stop, export what you have, ship it for review.
FAQs
Do I need expensive software to make an animatic? No. Premiere, Final Cut, and DaVinci Resolve (free) all handle frame-timing and audio layering well. Dedicated animatic tools are nicer workflows, not required.
Can I make an animatic without a storyboard? Technically yes (you could use photo references or AI-generated frames) but practically no. The storyboard IS the animatic's visual content. Skipping it means you're improvising, and improvised sequences tend to have pacing problems that only show up later.
What frame rate should the animatic be at? Match the final output. 24 fps for film, 30 fps for commercial/digital, 60 fps for game cutscenes. This matters because timing math doesn't translate cleanly between frame rates.
Is an animatic legally required before animation starts? No, nothing requires it. But most serious animation pipelines include one because the cost of not having one is much higher than the cost of making one.
Can AI make an animatic from a script without me touching frames? Increasingly, yes. Tools like M Studio can generate the storyboard, assemble it on a timeline, add AI voiceover, and produce an MP4 from a script prompt alone. You'll still want to adjust timing and review — but the first draft can exist in minutes.
What's the difference between an animatic and a leica reel? Same thing. Leica reel is the older animation-industry term. Modern productions say animatic.
Should I add transitions (fades, dissolves) or just hard cuts? Hard cuts almost always, unless the final film uses a specific transition intentionally. Fancy transitions in animatics mostly disguise whether a cut works — which is what you're trying to test.