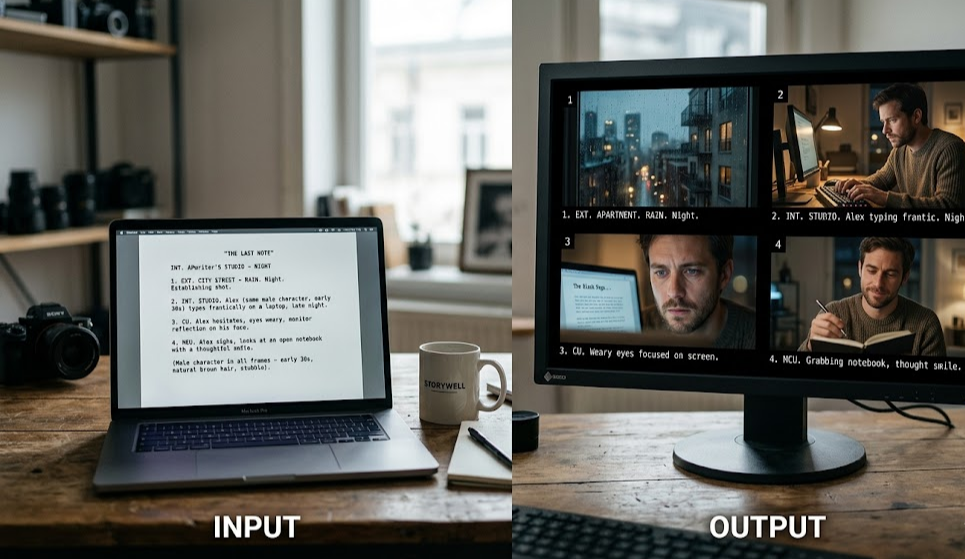
How do you create a storyboard using AI tools? Paste a script, scene idea, or client brief into an AI storyboard generator, let it extract shots and generate frames, then iterate on angle, lighting, and character consistency until the sequence reads like the film you're trying to make. The whole first pass takes minutes, not days — and unlike hand-drawn boards, revisions are cheap.
A 6-frame AI storyboard generated from a single script scene, with locked character consistency.
This is the TL;DR. The rest of this guide shows you exactly how to do it — with real prompts, the mistakes that will cost you a day if you skip them, and how to turn the boards into something a DP or client can actually review.
What an AI storyboard generator actually does
A storyboard is a communication tool. It tells your DP what you're thinking about lens and composition. It tells your production designer what the set needs to contain. It gives your AD something to schedule against.
Traditional storyboarding either requires that you can draw (most directors can't), that you hire an illustrator ($500–$2,000 per scene), or that you hack together reference photos and hope your DP can read your intent. All three are slow.
An AI storyboard generator shortcuts the bottleneck by turning your script — or even a rough paragraph — into rendered storyboard frames. You describe the shot in words; the system renders a usable image. Good tools preserve character appearance, lighting style, and world coherence across frames. Great tools let you pull a generated frame directly into a motion test or animatic.
Where AI storyboarding helps most:
Pre-pro on a project where you can't afford a full storyboard artist
Pitch decks where you need to show visual intent fast
Solo directors, indie teams, and small agencies
Anything where the script is still moving and you need boards to move with it
Where it doesn't help (yet):
Highly stylized boards that are themselves part of the deliverable (hand-drawn brand look, motion-graphic-style boards)
Complex VFX previs with specific technical annotation requirements
Anything where a human illustrator's interpretation is the value
The five steps to a usable AI storyboard
1. Start from your script, not from a blank prompt
The single biggest mistake people make is opening an AI image generator, typing "cinematic shot of a man in a diner, golden hour, 35mm," and getting a pretty but useless frame. That's not storyboarding — that's image generation.
A storyboard generator should read a block of script or a scene summary and break it into shots. You give it context once (characters, setting, tone) and generate a sequence instead of one-off frames. This is what preserves visual consistency across 10, 50, or 500 panels.
Practical prompt structure:
Scene: Anna's Diner, 2am. One waitress, three customers. Characters: - Anna (60s, tired, apron, steel gray hair) - Ray (40s, leather jacket, stubble, tired eyes) - Kid (early 20s, hoodie, nervous) Tone: noir, fluorescent overhead lighting, cold blues and sickly greens Camera: handheld feel, anamorphic, 35mm equivalent Shot 1: Wide establishing — exterior of the diner from across an empty street, neon sign flickering. Shot 2: Interior — Anna wiping down the counter, Ray in a booth with a coffee. Shot 3: Close — Kid's hands shaking as he sets a bag on the counter. Shot 4: Anna's eyes meeting Ray's in the diner window reflection.
Feed that whole block. The system generates four frames that share world and cast. Adjust angles individually, not the whole visual identity.
2. Lock in your characters before you generate the whole board
Visual consistency across frames is the dividing line between usable boards and AI slop. Before you let the generator run 80 frames, do this:
Generate one portrait of each character at the start.
Save those portraits as character references.
Set them as the reference across all subsequent frames.
Most AI storyboard tools support character references (sometimes called "characters," "consistency refs," or "persona locks"). Use them. A storyboard where the protagonist changes hair color between panel 4 and panel 7 is worse than one you drew with a sharpie.
3. Describe camera intent, not mood
The failure mode here is adjective-stacking — "dramatic, cinematic, moody, atmospheric" — which produces generic imagery because every AI-trained image on the internet was captioned that way.
Replace adjectives with camera grammar:
Instead ofWrite | "cinematic close-up" | "close-up, shoulder-high, subject facing camera three-quarters left" | "dramatic wide shot" | "wide shot, low angle from 2ft, subject centered, horizon below frame" | "moody lighting" | "single key light from upper-right, deep shadows on left side of face" | "professional looking" | "anamorphic lens, shallow focus, background soft"
Cameras and lenses are specific. AI tools generate better frames when your prompt is specific.
4. Iterate shot-by-shot, not on the whole board
Generate one scene at a time. Review it. Mark which shots work. Regenerate the ones that don't with a tighter prompt. Do NOT regenerate all 40 shots because one is wrong — you'll lose the ones that worked.
Good tools let you lock frames you like and regenerate only selected frames. Use that. Batch-regenerating is how an afternoon becomes a lost day.
5. Export for the people who actually need to read it
Boards only matter once someone else looks at them. Before you call it done:
Share a review link with the DP, director, or client
Export a PDF deck with shot numbers, descriptions, and timing
Layer the boards into an animatic with voiceover and music cues — this turns storyboards into a previs cut in the same workflow
If the tool you're using can go from board → animatic → motion test → edit without you rebuilding in a second tool, you've saved yourself a week.
Once you're happy with the boards, every frame flows into an animatic timeline with voice and music.
Common mistakes that waste time
Treating it like an image generator. You get one pretty frame, then a second one that doesn't match. Use a tool built for sequences, not one-offs.
Writing screenplays as prompts. Full page of dialogue → one image. AI can't render dialogue. Give it visual intent per shot.
Skipping the character lock. Every subsequent frame drifts. You end up with 40 panels that don't quite feel like the same film. Character references are non-negotiable.
Generating at final resolution. Drafts should be fast and cheap. Upscale only the ones you're going to use.
Ignoring shot continuity. The board should flow like a film — subjects maintain screen direction, eyelines connect, cuts make sense. If you wouldn't edit it, don't board it.
How to go from storyboard to finished film
Boards aren't the destination. The whole point is faster pre-production so you can actually shoot (or in AI filmmaking, generate) sooner.
A complete AI filmmaking workflow looks like this:
Script — AI-assisted draft, then human polish
Storyboard — generate frames from each scene
Animatic — add timing, narration, and temp music to the boards
Motion test — convert key frames into short motion clips to check camera moves
Production shots — generate or shoot the final footage
Edit & post — cut, sound design, color, export
Good storyboarding tools anchor this whole pipeline. You do the hard thinking in the boards; the rest of the stages inherit your decisions without you rebuilding context in a new tool.
FAQs
How do I create a storyboard using AI tools if I've never storyboarded before? Start by describing the scene in plain English. Who's in it, where it is, what's happening, what's the mood. A modern AI storyboard generator takes that and breaks it into shots. You review, keep what works, regenerate what doesn't. You don't need to know shot names or lens numbers to get a first pass — but your boards get dramatically better when you learn a bit of camera grammar (close/medium/wide, high/low angle, push/pull).
Can AI generate storyboards that stay consistent across many frames? Yes, if you use character and style references. Tools that just generate one image at a time will drift between frames. Tools built for storyboarding hold characters, lighting, and world parameters across a sequence. This is the key difference between a generic AI image generator and an AI storyboard generator.
How long does it take to storyboard a scene with AI? A 10-shot scene takes 5–20 minutes for a first pass, depending on how picky you are. A feature-length project with 400+ panels takes 1–3 days of focused work. Compare to 1–2 weeks minimum with a human illustrator.
Do I still need a human storyboard artist? For most indie and commercial work, no. For highly stylized boards where the drawing style is part of the deliverable (brand illustration, storyboards that will be published as artwork), yes. The illustrator's judgment is the value in those cases. For communication boards used in pre-pro, AI wins on speed and iteration cost.
What format should I export? PDF deck with shot numbers for client review. Review link for quick sharing. Animatic MP4 if you're going to screen the boards with timing and temp audio. Most tools export all three — use whichever the reviewer actually opens.
What's the difference between an AI storyboard generator and a storyboard app? A storyboard app gives you the canvas, layout tools, and export formats but expects you to bring the drawings. An AI storyboard generator includes the image generation. The best tools do both — canvas, AI frames, review tools, and export.