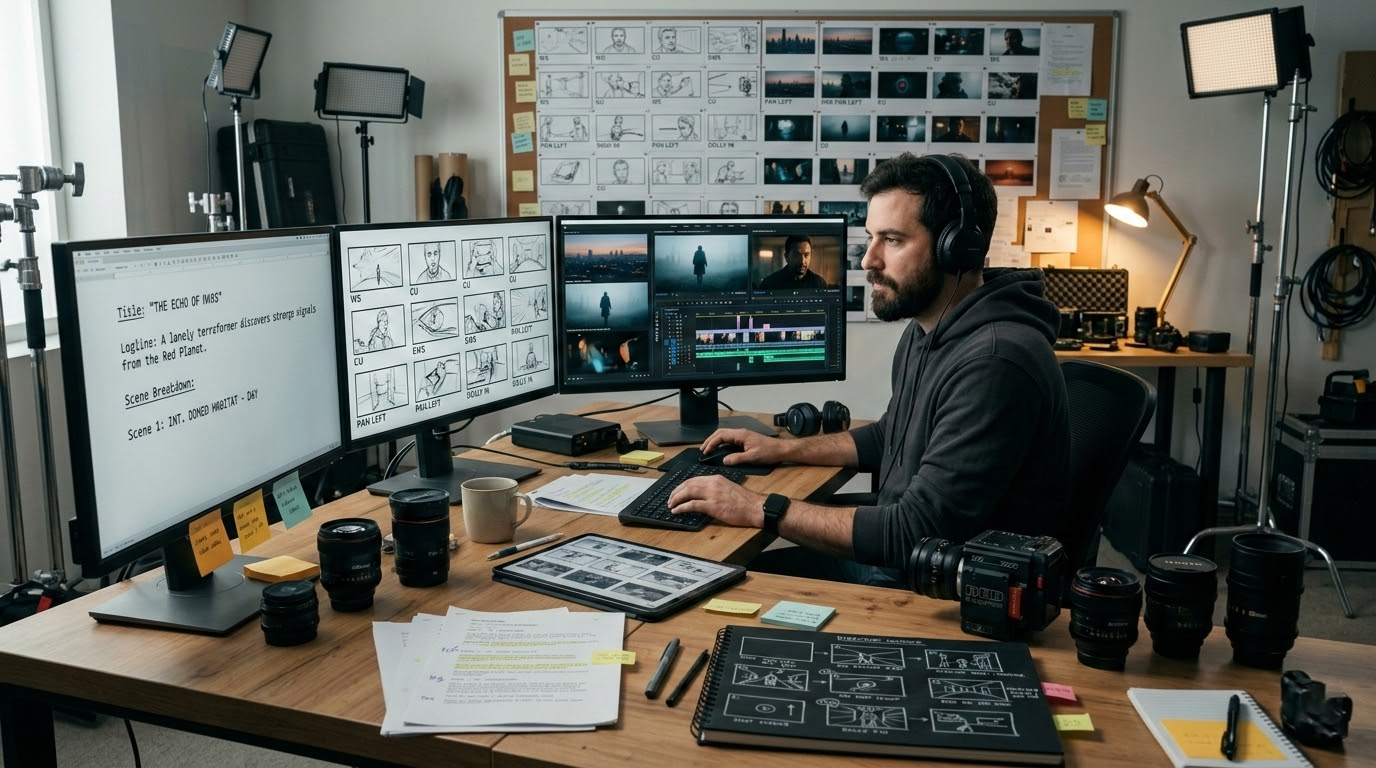
Most AI filmmakers work with five tools open at once. One for scripting, another for storyboarding, a third for video generation, a fourth for b-roll, and a fifth to cut it all together. Every handoff is a conversion step. Every conversion step is where momentum dies.
This guide covers the complete AI filmmaking workflow — six stages from concept to final cut — and how a unified studio approach eliminates the friction that kills most AI film projects before they reach the edit.
The Real Problem with Today's AI Filmmaking Toolchain
The standard 2026 AI filmmaking stack looks like this: ChatGPT for script, Midjourney for storyboards, Kling or Wan for video clips, ElevenLabs for voiceover, and DaVinci Resolve to assemble it all. That's five logins, five file formats, five billing accounts, and five APIs with different rate limits.
The tools are capable. The workflow is broken.
When your storyboard lives in one app and your shot list in another, you lose the thread. Continuity errors creep in. Character lighting changes between scenes. The color palette drifts. These aren't model quality problems — they're workflow problems. You solve them by keeping the project in one place.
The 6-Stage AI Filmmaking Workflow
A production-ready AI film moves through six stages. Understanding each stage — and where AI actually helps versus where it adds noise — is what separates AI filmmakers who finish projects from those who accumulate promising clips.
Stage 1: Concept and Logline
Before you touch any AI tool, write one sentence that answers: what happens, to whom, and why it matters? This is your logline. AI video models are not storytellers — they're renderers. The story is yours. The render is the model's.
A strong logline for AI filmmaking is also a generation constraint. "A delivery drone learns to lie" is better than "A futuristic story about AI." The first gives you scene structure. The second gives you nothing to generate.
At this stage: write your logline by hand. Use AI only to pressure-test it ("What's missing from this premise?") not to generate it.
Stage 2: Script and Scene Breakdown
A full screenplay is overkill for most AI short films. What you need is a scene-by-scene breakdown: location, characters present, action, and the one emotion the scene must land. Five to ten lines per scene, nothing more.
For each scene, write your generation prompt at this stage — not later. The prompt is part of the script. "EXT. ROOFTOP — DAWN — Drone hovers above sleeping city, camera tilts down slowly, golden hour light, 4K cinematic, Kling model" is a production instruction, not an afterthought.
If you're generating prompts at the generation step, you're improvising. If you write them into the breakdown, you're directing.
Stage 3: Storyboard and Shot Planning
You don't need drawn storyboards for AI filmmaking. You need a visual reference for each shot: angle (high/low/eye-level), movement (static/pan/push), and duration. Three decisions per shot, written into your breakdown or a simple visual grid.
AI-assisted storyboarding tools let you generate reference frames from your prompts before committing to full video generation. This is where you catch problems early. If the reference frame shows the wrong lighting or wrong character position, fix the prompt now — not after you've burned 20 generation credits on a sequence that doesn't match your edit plan.
Rule: generate a reference image for every scene. Never go into video generation cold.
Stage 4: Primary Scene Generation
This is where most AI filmmakers start. It's actually stage four.
With your prompts written and references approved, video generation becomes execution. You're not experimenting — you're rendering. This is the difference between directing and hoping.
Key decisions at this stage:
- Model selection: Different models have different motion physics, lighting behavior, and subject consistency. Kling 3.0 handles organic motion well. Wan 2.2 excels at environment generation. LTX-2.3 delivers 4K at 50fps for hero shots. Pick the right model for each scene type — not one model for the whole film.
- Duration: Generate clips slightly longer than you need. Cut points should be in the footage, not at the edge of the clip. 6-second target scene = generate 8 seconds.
- Consistency seeds: If your video model supports it, use the same character seed across scenes featuring the same character. Consistency across cuts is what separates a film from a demo reel.
Stage 5: B-Roll, Inserts, and Cutaways
Primary scenes carry the story. B-roll carries the pacing.
After generating your primary scenes, identify every cut point where you'll need a reaction shot, an environmental insert, or a transition. Generate these as a second batch. B-roll prompts are simpler — abstract, environmental, textural — and fail less often.
Plan for 40% of your final runtime to be b-roll. If your film is 3 minutes, you need 72 seconds of usable b-roll. Generate at least 120 seconds to have selection.
Common b-roll types for AI shorts:
- Environmental establishes (skylines, interiors, landscapes)
- Object inserts (hands, screens, machinery)
- Transition abstracts (light flares, blur, textural motion)
- Time-lapse equivalents (long focal lengths, slow motion)
Stage 6: Assembly, Audio, and Output
AI generates footage. You edit the film.
Assembly follows your scene breakdown — you already know the cut order. The actual editing decisions happen at micro-level: where exactly to cut within the clip, how long to hold a frame, when the music swells versus when it drops.
Audio stages:
- Music: Lock your soundtrack first. Edit to the music, not the other way around.
- Voiceover/narration: Record or generate after picture lock. AI voiceover models (ElevenLabs, Kokoro, PlayHT) work best when they have a final script with natural pauses written in.
- Sound design: Ambient sound and SFX do more for perceived production quality than any other post-production step. AI-generated video is silent — even basic ambient sound makes it feel real.
- Color: Apply a simple LUT to unify the look across scenes generated by different models. Even a free cinematic LUT will reduce the "mismatched AI footage" problem significantly.
Why the Unified Studio Approach Wins
Every stage above benefits from staying in one context. When your scene breakdown, reference frames, generated clips, and assembly notes live in the same workspace, you make better decisions faster.
The multi-tool stack forces you to re-describe your project at every stage. You write the concept in ChatGPT, re-describe the characters in Midjourney, re-explain the mood in Kling, and re-import everything into Resolve. Each re-description introduces drift. The coffee shop from your concept becomes a different coffee shop in your storyboard becomes a different one again in your final clip.
An AI-native filmmaking studio keeps the project in one place. Your prompt history, your reference frames, your generated clips, your cut notes — one workspace, one thread, no re-description tax.
This is the core argument for platforms like mstudio.ai: not that they have better individual model quality than Runway or Kling in isolation, but that a coherent workflow inside one studio produces a more coherent film.
The Filmmaker's Checklist (Before You Generate Anything)
- [ ] One-sentence logline written
- [ ] Scene breakdown: 5-10 lines per scene with prompt written at breakdown time
- [ ] Shot angle and movement decision for every scene
- [ ] Reference image generated for every scene (before video generation)
- [ ] Character consistency seed identified if model supports it
- [ ] B-roll list: minimum 8-10 insert shots identified
- [ ] Music track selected or licensed before editing begins
- [ ] Audio plan: narration, SFX, ambient — what's generated vs recorded
Do this before you generate a single frame. The filmmakers who finish AI projects aren't the ones with the best models — they're the ones with the best pre-production.
Start Your AI Film
mstudio.ai is built for the workflow described above — AI-native, designed for the full pipeline from concept to cut. If you've been jumping between five tools and losing the thread, the unified studio approach is worth trying.