Most people who search "ai film maker" are looking for the same thing: a way to produce professional-quality video without a camera crew, a production budget, or three years of After Effects tutorials. That's a reasonable goal in 2026, and the tools have finally caught up.
This guide covers what AI filmmaking actually looks like today — the real workflows, where things still break, and how to use mstudio.ai to go from idea to finished film in hours instead of weeks.
What Does "AI Filmmaker" Actually Mean?
The term gets used loosely, so let's be specific. An AI filmmaker uses generative tools to handle the production steps that traditionally required expensive gear or specialist skills: scene generation, editing, color grading, voiceover, music. The creative direction still comes from you. The execution gets offloaded to AI.
This is different from "AI content creator" or "AI influencer." A filmmaker is building a story with a beginning, middle, and end — even if that story is two minutes long. That structural requirement is what separates filmmaking from just generating clips.
What's changed in the last 12 months is that the individual tools have gotten good enough to chain together. You can now go from a written script to a rough cut without touching a camera. The challenge is knowing which tools to use in what order, and where to stitch them together without losing quality.
The Core AI Filmmaker Workflow (2026)
Here's the stack that works. Not theoretical — this is what's actually producing results.
Step 1: Script and Storyboard
Start with a script. Even a one-page outline works. The tighter your script, the better your output at every downstream step.
From the script, generate a visual storyboard. You're not looking for art — you're looking for composition references. Which angle works for this scene? Interior or exterior? Day or night? Getting these decisions made on paper (or screen) before you touch a video tool saves enormous time.
Tools that work here: Claude or GPT-5 for script, Midjourney or Flux for storyboard frames. mstudio.ai connects these stages in one timeline editor — you don't need separate apps for generation, editing, and export.
Step 2: Scene Generation
This is where most AI filmmakers spend the most time, and where the quality ceiling has raised the most. Modern video generation models — Kling 3.0, Veo 3.1, Wan 2.6 — can produce 5-10 second clips that hold up to scrutiny at 1080p.
The key insight that most tutorials skip: generate 3-4 variations of each scene, not one. The hit rate on video generation is not 100%. Generate more than you need, then select the best take — exactly like a real director.
Your prompt structure matters more than which model you use:
- Shot type first: "Close-up", "Wide establishing shot", "POV"
- Subject: What's in frame, what's it doing
- Environment: Setting, lighting, time of day
- Movement: Camera motion or subject motion — be explicit
- Mood/tone: Cinematic, documentary, noir, etc.
Example: "Wide establishing shot, abandoned warehouse exterior at golden hour, no people, slow push forward, cinematic, desaturated tones."
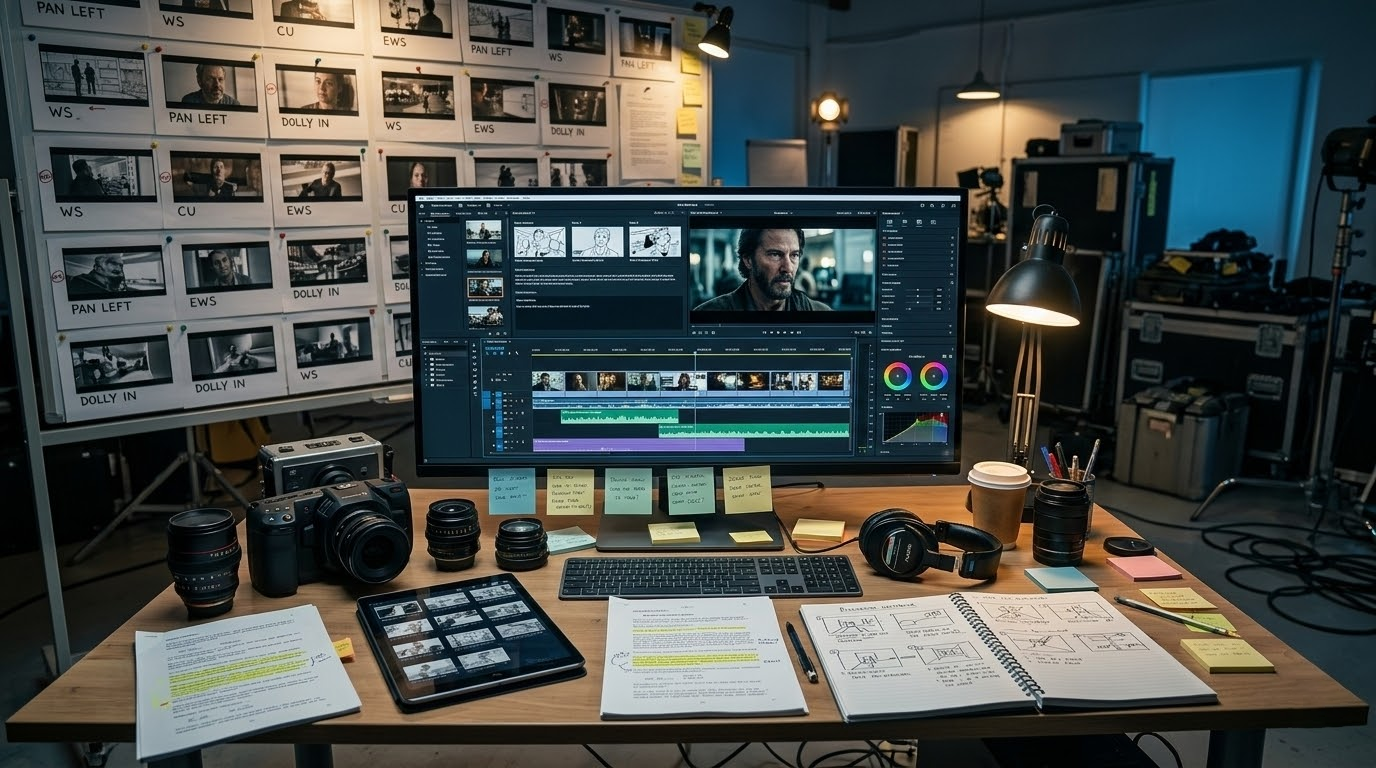
Step 3: Assembly and Editing
Once you have your clips, you need to cut them together. This is where most AI filmmaking setups fall apart — people treat the video generation step as "done" and then struggle with editing.
The challenge with AI-generated clips is consistency: lighting shifts between clips, character appearance changes across scenes, and transitions need to feel intentional. mstudio.ai is built for this — it's an AI-native NLE where you orchestrate clips from multiple generators in a single timeline, add audio, and export a finished film without bouncing between five different tools.
What you're building in this step:
- A rough cut with clips in order
- Transitions (cuts, dissolves — keep it simple early)
- Pacing adjusted to your script beats
Aim for your rough cut to be 20-30% longer than your target runtime. You'll cut down in polish.
Step 4: Color and Look
Color grading is what separates "AI-generated clips stitched together" from "a film." A consistent color grade across all your clips makes everything read as one piece of work rather than a collection of AI outputs.
The fastest approach: pick a reference frame (a still from the kind of film you're making) and match your grade to it. Apply a LUT across your assembled timeline. If you're using DaVinci Resolve for color, export your mstudio cut as XML and round-trip the grade. You don't need to grade clip by clip.
Common grading mistakes AI filmmakers make:
- Over-saturating to compensate for flat AI output — hold back on saturation
- Inconsistent shadow depth across clips — lock your blacks early
- Skipping highlight rolloff — it's what makes digital look cinematic vs. flat
Step 5: Audio — Voiceover, Music, Sound Design
Audio does 50% of the emotional work in film. Most AI filmmakers spend 90% of their time on visuals and 10% on audio. Flip that ratio and your output improves dramatically.
Three audio layers every AI film needs:
- Voiceover or dialogue: ElevenLabs for realistic voice, or use a text-to-speech model via ModelsLab's Audio API if you're building this into a pipeline
- Score: Suno, Udio, or licensed music — match the tempo to your edit, not the other way around
- Ambient and SFX: Room tone, environmental sounds — often ignored, always noticeable when absent
Mix audio in a separate step after your picture is locked. Don't try to grade and mix simultaneously.
Using mstudio.ai as Your AI Filmmaking Studio
mstudio.ai is built for exactly this workflow. Instead of managing six different AI tools with separate accounts and exports, you work inside one platform that handles generation, editing, and audio in a single workspace.
What this means practically:
- Orchestrate shots from multiple AI generators (Veo, Kling, Runway) in one timeline
- Add BGM, voiceover, and SFX inside the same workspace
- Export full-length films — not capped at 60 seconds like most AI video tools
- No download-import-stitch loop between apps
The multi-model capability matters. Different generators produce different aesthetics. Kling 3.0 handles motion well for action sequences. Runway handles portrait and indoor lighting consistently. Veo 3.1 excels at naturalistic environments and camera movement. mstudio lets you pull from each generator without rebuilding your project between platforms.
Start your AI filmmaking project on mstudio.ai →
How Long Does an AI Film Actually Take?
Honest numbers from real projects:
- 90-second short film: 4-6 hours from script to rough cut, 2-4 hours for polish
- 5-minute documentary format: 8-12 hours total across 2-3 sessions
- 15-minute narrative short: 2-3 full days, mostly in revision and consistency fixes
The biggest time sink is consistency — fixing clips where the AI drifted in lighting or character appearance. This is where using mstudio.ai's built-in tools versus managing clips in Premiere or DaVinci saves the most time.
The second biggest time sink is audio. Budget 30% of your total production time for audio, minimum.
Where AI Filmmaking Still Breaks Down
Not everything works yet. Here's where you'll hit walls:
Dialogue-heavy scenes: Video models still struggle with lip sync and realistic mouth movement. If your film is dialogue-driven, either write around it (voiceover + reaction shots) or accept that this is the current ceiling.
Consistent characters across scenes: Getting the same character to look the same in scene 4 as they did in scene 1 is unsolved at the free/consumer tier. Reference images and LoRA fine-tuning help, but it takes setup time.
Long takes: AI video models top out around 10 seconds per clip. A 30-second continuous take is built by stitching multiple generations together. The joins show if you're not careful with your transitions.
None of these are permanent ceilings — they're 2026 limitations. Plan around them and your output quality goes up substantially.
Distributing Your AI Film
Once you have a finished cut, where does it go?
YouTube is the obvious distribution channel, and AI films perform better there than most people expect. The algorithm doesn't penalize AI-generated content; it penalizes low engagement. A well-structured short film gets watched.
Short-form (Instagram Reels, TikTok): Cut a 30-60 second trailer from your film. This is often the top of the funnel that drives people to your full YouTube version.
Film communities: Vimeo Staff Picks still feature AI films. The quality bar is high, but AI-generated films have appeared in the Staff Picks rotation. Production quality matters more than technique.
One distribution move that works: post the "making of" alongside the film. Audiences are genuinely curious about how AI films are made. A 2-minute behind-the-scenes showing your workflow often outperforms the film itself on engagement.
The Business Model: When Does AI Filmmaking Pay?
A few categories where AI filmmaking is generating real revenue right now:
- Brand video production: Small businesses need video content and can't afford traditional production. AI filmmakers are charging $300-800 per 60-second explainer. The margin is high because the per-clip cost is low.
- YouTube channel: Faceless channels with AI-generated content are running 50-100K+ subscribers. Revenue via AdSense + affiliate links. Build time: 3-6 months to meaningful traffic.
- Stock footage: High-quality AI clips sold on Pond5, Artgrid, Storyblocks. Passive, but requires building a catalog of several hundred clips before meaningful income.
- API integration: If you're a developer, the most scalable play is building a video generation service on top of ModelsLab's API — white-label AI filmmaking tools for clients who don't want to manage the model stack themselves.
Getting Started This Week
The fastest path to your first AI film:
- Write a 90-second script. One location, two characters maximum, clear beginning and end.
- Generate storyboard frames (Midjourney or Flux) for each scene beat. 5-8 frames total.
- Generate 3 video clips per scene using mstudio.ai. Pick the best take from each set.
- Assemble your rough cut. Don't overthink transitions — cuts work.
- Apply a single color grade across all clips.
- Add voiceover, ambient sound, and a music track.
- Export and upload.
Your first film won't be perfect. That's fine. The second one will be better. The fifth one will be good. The tenth one might be something you're actually proud of.
AI filmmaking has a real learning curve — it's just a different curve than traditional filmmaking. You're learning prompting instead of camera operation, and color matching instead of lighting setup. The creative decisions are the same. The tools are different.